Diagnostic analysis of gas turbine hot section temperature measurements
UDK 621.43.004.62
IGOR LOBODA*, YAKOV FELDSHTEYN**,
CLAUDIA FERNANDA VILLARREAL GONZÁLEZ*
*National Polytechnic Institute, School of Mechanical and Electrical Engineering, Mexico
**Compressor Controls Corporation, USA
DIAGNOSTIC ANALYSIS OF GAS TURBINE HOT SECTION
TEMPERATURE MEASUREMENTS
Temperatures measured in a hot section of gas turbines are very important for a gas path analysis. A suite of parallel thermocouples are usually installed in the same gas path station in order to compute a filtered and averaged temperature quantity for its further use in control and diagnostic systems. However, in spite of the preliminary treatment, the resulting quantity is not completely free from errors. To eliminate or reduce the errors, the present paper analyzes anomalies in the behaviour of each thermocouple of an industrial gas turbine engine. To that end, time graphs of both measured magnitudes themselves and their deviations from reference magnitudes are plotted. In order to draw sound conclusions, the analysis is conducted on a large volume of the data collected for three particular engines.
Key words: gas turbine, gas path analysis, thermocouples, field data, temperature recording errors.
Nomenclature
Abbreviations
EGT Exhaust gas temperature
GPA Gas path analysis
HPT High pressure turbine
PT Power turbine
PTT Power turbine temperature
T_PT Mean power turbine temperature
Scalar parameters and vectors
dTpt Deviation of a particular PTT probe
dTt Deviation of a particular EGT probe
tEngine operation time variable
![]() Vector of baseline function’s arguments
Vector of baseline function’s arguments
![]() Gas path variable
Gas path variable
![]() Maximal deviation
Maximal deviation
![]() Signal-to-noise ratio
Signal-to-noise ratio
![]() Deviation of a gas path variable
Deviation of a gas path variable
![]() Spread (of temperature); interval (of time)
Spread (of temperature); interval (of time)
![]() Error of a gas path variable; noise range (of temperature)
Error of a gas path variable; noise range (of temperature)
![]() Error components
Error components
![]() Standard deviation of the errors
Standard deviation of the errors
Subscripts and superscripts
0Baseline function value
* Measured value
iIndex of a thermocouple probe
max Maximum value
med Mean value
T Temperature
![]() Total value
Total value
1. Introduction
Gas path analysis (GPA) techniques provide invaluable insight into gas turbine condition. These techniques are based on measured and recorded gas path variables (pressures, temperatures, rotation speeds, fuel consumption, etc.) and hot section temperatures (exhaust gas temperature as well as temperatures behind low and intermediate pressure turbines, if any) among them. Advancements in electronics and computer processing enable less expensive field data collection to support the GPA.
As engine integrity depends on gas temperature values, temperature measurement and recording are of great importance for gas turbine control and diagnostic systems. The control system can employ these variables, especially the EGT, in engine control programs in order to avoid engine overheating. As to the diagnostic system, some temperature measurement applications worthy to mention are given below.
In engine component diagnostic techniques, which involve all available gas path variables into the analysis, the gas temperatures are confirmed to be very informative diagnostic parameters [1,2,8]. Life usage algorithms of the hot section, which is the most critical part of the engine, also employ these temperatures [10]. In such applications, the gas temperature in each hot section measurement station is commonly computed by averaging the data of particular thermocouple probes. However, temperature profiles contain additional valuable information on the performances of a burner and turbines. For this reason, gas temperature profile monitoring [3] became an integral part of modern diagnostic systems.
As noted in many papers, for example, in [5], thermocouple probes as well as other gas path sensors can deteriorate with time or present abrupt malfunctions. Such errors can be significant and impact on control and diagnosis techniques. That is why it is desired that the techniques take into account possible errors in input information.
Sensor fault accommodation procedures, which mitigate a negative effect of sensor errors on a control system and allow the control to be tolerant to them, are proposed [for example, 7].
With respect to the diagnostic techniques, some options are considered to take into consideration possible sensor errors and faults. A sensor-fault-tolerant diagnosis tool is proposed [6]. Another option is the multipoint method described for instance in [5]. It compensates a sensor error impact by increasing input information through data collection in many different operating points. Additionally, many GPA techniques of today detect and identify sensor faults [see, for instance, 4,5,6], thus extending traditional engine component diagnosis over a gas path measurement system.
Although various diagnostic algorithms take into consideration an uncertainty in input information, they only partially mitigate the impact of errors and faults but can not completely eliminate it. One of the difficulties is connected with the fact that the characteristics of sensor normal errors are also known with an uncertainty. Usually, a total uncertainty range only can be involved into diagnosis [for example, 11,12] while the proportion between random and systematic error components and their drifts remain unknown. Thus, the issue of the input information tracking and validation remains relevant.
Direct off-line analysis of raw measurements [see, for example, 3] can contribute in solving this challenging problem. The analysis yields the knowledge of sensor error performance. This allows excluding sensor faults, reducing sensor errors and better accommodating them in diagnostic algorithms.
In the previous investigations [see 1, 2], we also conducted a metrological analysis of gas turbine field data. The objective was to ensure high quality of input data for gas turbine diagnostic algorithms by identifying measurement errors and extracting them from the data. The hot section temperatures were analysed among the other variables of a standard gas turbine measurement system. The temperatures were presented by their mean values computed by averaging particular probes' data.
Proceeding with the previous off-line analysis on field data, the present paper looks at the behaviour of individual thermocouple probes. The objective is to obtain new information about probe error performance by analysing great bulk of the data. In the paper, the term "probe error" implies a total measurement error without dividing it into a sensor proper error and a recording error.
In the present analysis, data of each particular probe are studied against the background of other probes data. Deviations of measured probe values from their baseline (reference) values are employed as well. Tracking the deviations has been found to be a good procedure to detect and localize sensor problems.
The next section describes the principles of the thermocouple probe data analysis.
2. Principles of gas temperature analysis
The present investigation is partly based on the principles formed in our previous works. In these papers, as mentioned before, we explored carefully acquired data of averaged hot section temperatures as well as other gas path variables.
The exploration of gas turbine field data was executed with the aid of advanced graphical tools. They included tracking the deviations of measured variables.
A deviation
![]() of a monitored gas path variable
of a monitored gas path variable
![]() is computed according to the expression
is computed according to the expression
 , (1)
, (1)
where a baseline function
![]() presents a healthy engine performance. A vector
presents a healthy engine performance. A vector
![]() of function’s arguments unites the variables setting an engine operating point (atmospheric conditions and engine control variables). In order to determine the baseline function, a special data set called a reference set is created. To verify the function as well as deviation quality, other set, which is called a validation set, is formed. We usually include all available recorded data in it.
of function’s arguments unites the variables setting an engine operating point (atmospheric conditions and engine control variables). In order to determine the baseline function, a special data set called a reference set is created. To verify the function as well as deviation quality, other set, which is called a validation set, is formed. We usually include all available recorded data in it.
It is a main problem in computing the deviations to get an adequate baseline function. We demonstrated in previous works [1,9] that the second order full polynomials are adequate enough. That is why, such polynomials are employed in the present paper.
As noted in [1,2], the deviations
![]() not only can be good engine deterioration indicators but also are very sensitive to sensor malfunctions. Being great, such malfunctions can mask the effects of engine gradual deterioration and sudden fault. Hence, it is of great importance to exclude or reduce the sensor malfunctions in order to make the deviations to meet better the diagnostic needs.
not only can be good engine deterioration indicators but also are very sensitive to sensor malfunctions. Being great, such malfunctions can mask the effects of engine gradual deterioration and sudden fault. Hence, it is of great importance to exclude or reduce the sensor malfunctions in order to make the deviations to meet better the diagnostic needs.
Figure 1 exemplifies the EGT deviations of a gas turbine for natural gas pumping stations. The deviations are plotted here against an operation time t (in this figure and all figures below a variable t is given in hours). As can be seen, the presented data cover approximately 4,5 thousand hours. The deviations
![]() computed on real measurements with noise are marked by a grey colour while a black line denotes ideal deviations
computed on real measurements with noise are marked by a grey colour while a black line denotes ideal deviations
![]() without noise. A washing of a gas turbine axial compressor at the time point t = 7970 (here and below an operation time is given in hours) as well as fouling periods before and after the washing are well-distinguishable in the figure.
without noise. A washing of a gas turbine axial compressor at the time point t = 7970 (here and below an operation time is given in hours) as well as fouling periods before and after the washing are well-distinguishable in the figure.
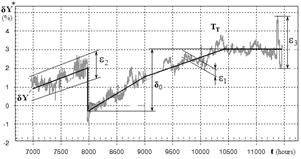
Fig. 1. Deviations' characteristics
(The deviations are calculated for the EGT)
A difference
![]() can be considered as an error. If we designate the maximum deviation
can be considered as an error. If we designate the maximum deviation
![]() as
as
![]() , the signal-to-noise ratio
, the signal-to-noise ratio
![]() , (2)
, (2)
where
![]() is a standard deviation of the errors, will be an index of diagnostic quality of the deviations
is a standard deviation of the errors, will be an index of diagnostic quality of the deviations
![]() . To enhance the quality we should reduce the errors
. To enhance the quality we should reduce the errors
![]() . To do it better, it is important to know error structure and sources. According to Fig.1, the total error
. To do it better, it is important to know error structure and sources. According to Fig.1, the total error
![]() consists of three elemental errors and can be given by the formula:
consists of three elemental errors and can be given by the formula:
![]() , (3)
, (3)
where
![]() is a normal noise which is observed at every time point and has the amplitude smaller than 0,3%,
is a normal noise which is observed at every time point and has the amplitude smaller than 0,3%,
![]() presents slower fluctuations of the amplitude limited by 1,5%, and
presents slower fluctuations of the amplitude limited by 1,5%, and
![]() means single outliers with the amplitude greater than 1,5%.
means single outliers with the amplitude greater than 1,5%.
The errors
![]() ,
,
![]() , and
, and
![]() can be induces both sensor malfunctions of the monitored variable
can be induces both sensor malfunctions of the monitored variable
![]() and inadequacy of the reference function. It is important for the current investigation to distinguish error sources and recognize the sensor malfunctions against the background of the function inadequacy.
and inadequacy of the reference function. It is important for the current investigation to distinguish error sources and recognize the sensor malfunctions against the background of the function inadequacy.
It was shown in [1] and follows from analyzing a structure of formula (1) that the same total error
![]() can also be divided into four components according possible error sources. Three of them are related with the reference function and were studied in [1,2]. The fourth component is induced by errors of a monitored variable. The present paper will consider errors of particular thermocouples.
can also be divided into four components according possible error sources. Three of them are related with the reference function and were studied in [1,2]. The fourth component is induced by errors of a monitored variable. The present paper will consider errors of particular thermocouples.
The availability of parallel measurements of a suite of thermocouple probes installed in the same engine station gives us new possibilities of thermocouple malfunction detection by means of deviation analysis. If we choose the same reference function arguments and form particular reference sets from the same portion of recorded data, the errors related with the function will be approximately equal in deviations of all particular probes. That is why, the differences between deviations of one probe and deviations of the other probes can denote probable errors and faults of this probe. In the synchronous deviation curves, which are constructed in the present paper versus an engine operation time, such differences are well visible. In addition to the probe malfunction detection, such curves allow estimating general diagnostic quality of each probe through signal-to-noise ratio (2).
In the paper, direct analysis of thermocouple probe measurements is conducted as well. To this effect, synchronous plots for all particular probes are constructed vs. the operation time. Engine operating conditions change from one time point to another and this explains common temporal changes of the curves. Anomalies in behaviour of a particular probe can confirm a probe's malfunction. Synchronized perturbations in curves of some probes may be the result of a real temperature profile distortion because of a hot section problem.
The principles of the gas temperature analysis described above are applied to an industrial free turbine type power plant for generating electricity. This plant is chosen as a test case because a large volume of field data, which include thermocouple measurements, is available. In the next section, common results of the study of power plant gas temperatures are discussed. The section begins with analysis conditions given in subsection 3.1.
3. Common Results of Gas Temperature Measurement Analysis
3.1. Analysis Conditions
For the chosen power plant, field data of three particular engines, which are called in the paper as engine 1, engine 2, and engine 3, are available. The data of each engine cover about one year of maintenance and include numerous cycles of fouling and washings. For instance, a total period of engine 1 data acquisition embraces 4914 hours of operation and consists of five fouling intervals divided by the washings.
The data of each engine were filtered, averaged, and recorded hourly in an individual database. All databases include necessary measurements of engine operating conditions and monitored gas temperatures: the EGT and a power turbine exhaust gas temperature (PTT). The suite of 11 thermocouple probes is used to measure the EGT while the PTT measurement is presented by six probes. The data of all particular thermocouple probes as well as EGT and PTT mean values are incorporated in the databases.
With respect to the reference functions for computing particular probes' deviations, all the functions have the same three arguments, which have been determined in [2] as the best: free turbine shaft power, atmospheric temperature, and inlet pressure. A free turbine rotation speed, one of common variables of an engine operating condition, is not the argument now because the speed is maintained constant for the analyzed power plant.
Each function is a second order full polynomial with three arguments and has 10 unknown coefficients. The reference sets for determining the functions' coefficients have been composed from the first 200 time points after the first washing. The coefficients were calculated by the least square method because of a considerable excess of input information (200>>10) and absence of gross errors in the sets.
3.2. Analysis of the Deviations
For the engines under analysis, the reference functions and the deviations have been computed for all EGT and PTT particular probes as well as for EGT and PTT mean temperatures. The deviations of engines 1 and 3 showed trends due to fouling and washings. Since such trends allow estimating the signal-to-noise ratio, they will be useful to assess accuracy of each probe. However, engine 2 deviations demonstrated no notable systematic changes. Probable explanation is that, instead of off-line washings of engines 1 and 3, more frequent on-line washings were applied to unit 2, which resulted in an approximately constant fouling severity. It can also be noted after the comparing engines 1 and 3 that the engine 1 deviations demonstrate more cases of abnormal behaviour, which are interesting for the current analysis. For these reasons, the engine 1 has been chosen to illustrate gas temperature deviation behaviour.
Figure 2 shows all EGT deviations (11 deviations dTti corresponding to particular probes and mean temperature deviation dTtmed) as function of an operation time t. It is known that the washings took place at the time points t = 803, 1916, 3098, and 4317. As can be seen, deviation plots reflect in a variable manner the influence of the fouling and washings. The deviation dTtmed does it better than deviations of particular probes dTti, i=1-11. Among deviations dTti, quantities dTt5 and dTt6 , for example, have almost the same diagnostic quality as dTtmed, while quantities dTt1 and dTt2 are of little quality. Such differences can be partly explained by variations in probe accuracy and reliability. For example, elevated random errors of the deviations dTt1 and dTt2 over the whole analyzed period can be induced by greater noise of the first and second EGT probes. The dTt1 fluctuations in the time interval 1900 - 2600 are probably results of frequent incipient faults of the first probe. Large dTt7 spikes near the time point t= 4900 can certainly be considered as consequences of great single faults of the seventh probe. However, deviation shifts around the point t= 3351 present the most interest for the current analysis. The shifts look like a washing result but they have opposite directions. This case will be considered in section 4.3.
Let us now consider the PTT deviations plotted in Fig.3. Comparing this figure with Fig.2, one can see that the behaviours of new and previous deviations are different. The PTT deviations of particular probes seem to be very similar. All of them properly reflect the fouling and washings as well as have shifts at the time point t= 3351. Only small anomalies of each particular deviation can be detected. That is why the deviations of mean temperature dTptmed look like deviations of each particular probe. The conclusion can be drawn from this analysis that the thermocouple probes installed behind the power turbine (PT) have more stable performances than the probes behind the high pressure turbine (HPT). This may be explained by a higher HPT temperature level.
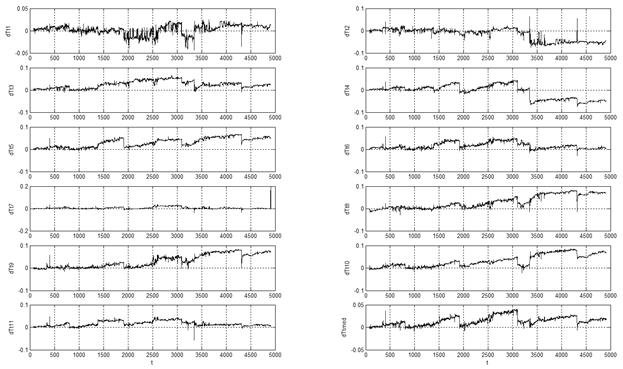
Fig. 2. EGT deviations
(Engine 1; 11 thermocouple probe deviations dTti and a deviation dTtmed of mean EGT variable)
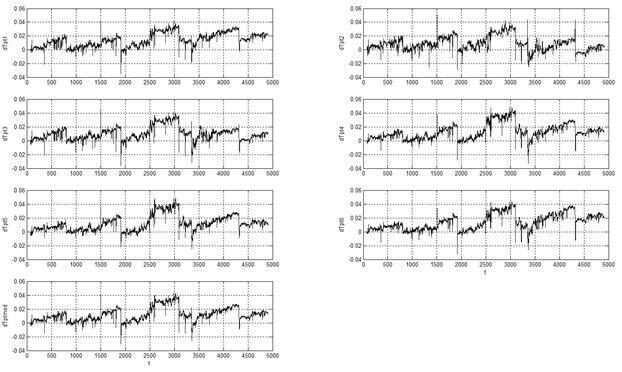
Fig. 3. PTT deviations
(Engine 1; 6 thermocouple probe deviations dTpti and a deviation dTptmed of mean PTT variable)
It is also useful to compare the deviations of mean EGT and PTT quantities. As can be seen in Fig.2 and Fig.3, behaviours of the deviations dTtmed and dTptmed are different. Although these figures are not sufficient to conclude what deviation is better in a diagnostic sense (for example, on the basis of the signal-to-noise ratio (2)), this issue has been investigated in [2]. In spite of more reliable PTT probes, the conclusion was drawn that general quality of the EGT deviations is slightly higher.
Detailed deviation analysis performed for all three engines has also demonstrated that, in addition to the mentioned case at the point 3351, there can be other irregularities in deviations of particular probes that can not be explained by probe faults. The shifts induced by the washings give an example of such irregularities. They should be equal but can indeed differ by 30%. We may see this effect by comparing the dTt5 and dTt9 shifts induced by the second washing on engine 1 (Fig.2, t = 1916) or the dTpt1 and dTpt6 displacements due to the first washing (Fig.3, t = 803). Other irregularity case can be seen in Fig.2 at the point 1380. Some deviations (for example, dTt11) are positively displaced at this point while some others have negative shifts or no changes (see the deviation dTt4).
Displays of the noted irregularities are very similar to the impact of a reference function inadequacy. As shown in [1], such inadequacy provokes deviation perturbations. With the examples given above, we can state that the function inadequacy also results in differences between the deviations of parallel probes that measure the same temperature. That is why the deviation analysis can only help with problem detection in particular thermocouple probes. To identify the problems, we analyze below direct temperature measurements.
3.3. Direct Temperature Analysis
If we plot temperature curves for all probes of a suite in the same coordinates (for example, all temperatures vs. the operation time), an anomaly of a particular curve will indicate a problem with the corresponding probe. Consequently, observing this curve against the background of the other curves, we are capable to identify a probe fault when the perturbation exceeds normal errors.
Such analysis of parallel curves has been performed for all available data. Figures 4 and 5, which present the first part of the engine 1 gas temperature recordings, exemplify the data analyzed and the graphs used. Here and below, temperatures are given in Celsius degrees. The performed study allowed revealing various cases of anomalies in probe data: gross and hidden probe faults as well other irregularities. Some cases of the most interest will be considered later in section 4.
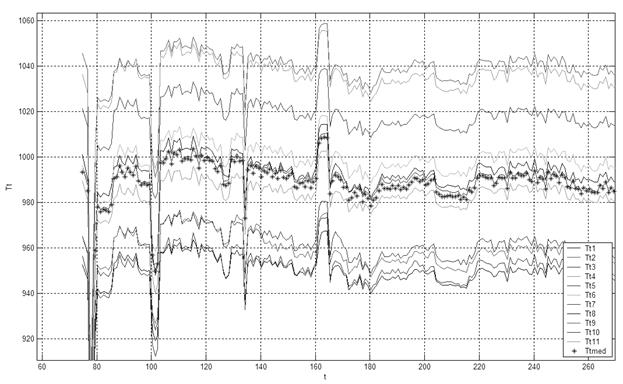
Fig. 4. Exaust gas temperature plots
(Engine 1; temperatures Tti of 11 thermocouple probes and a mean temperature Ttmed; data collected during the first 270 hours of operation)
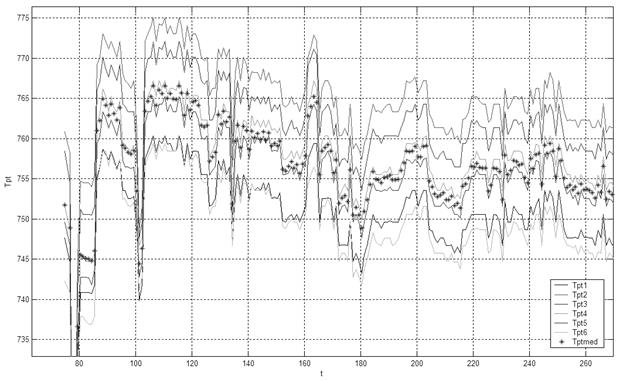
Fig. 5. Power turbine temperature plots
(Engine 1; temperatures Tpti of 6 thermocouple probes and a mean temperature Tptmed; data collected during the first 270 hours of operation)
In addition to the revealed anomaly cases, common characteristics of thermocouple normal behaviour have been determined. Knowledge of such characteristics will help us to better recognize sensor data irregularities against the background of normal sensor noise and regular temperature change.
The graphs given in Fig. 4 and Fig. 5 help to introduce the thermocouple characteristics. Comparing the figures, it can be seen that EGT and PTT measurements change very similarly. The explanation of such common changes is obvious – the influence of variable engine operating conditions. As for particular probes of the same suite (EGT suite or PTT suite), their individual curves are practically synchronous. Consequently, it can be stated that a normal thermocouple noise level
![]() is not too high and there are no sensor faults in the presented measurements. We can also see that a spread
is not too high and there are no sensor faults in the presented measurements. We can also see that a spread
![]() between particular probe temperatures recorded at the same time point is considerable (up to 85°C in Fig. 4).
between particular probe temperatures recorded at the same time point is considerable (up to 85°C in Fig. 4).
Maximal values
![]() and
and
![]() of the described above noise and spread characteristics have been estimated for temperatures EGT and PTT of all three engines. Additionally, temperature levels
of the described above noise and spread characteristics have been estimated for temperatures EGT and PTT of all three engines. Additionally, temperature levels
![]() were computed for three engines by the averaging their mean temperatures Ttmed and Tptmed in total analyzed time intervals
were computed for three engines by the averaging their mean temperatures Ttmed and Tptmed in total analyzed time intervals
![]() . Table 1 includes the obtained characteristics.
. Table 1 includes the obtained characteristics.
As can be seen, there are no engine to engine differences in
![]() with the exception of the engine 1 EGT, which has a two times greater noise compared with the other engines. Such difference can not be explained by a slightly higher power level of engine 1 and we can state that an EGT probe suite of this engine is less accurate.
with the exception of the engine 1 EGT, which has a two times greater noise compared with the other engines. Such difference can not be explained by a slightly higher power level of engine 1 and we can state that an EGT probe suite of this engine is less accurate.
Table 1
Averaged characteristics of thermocouple probes
Engine |
|
Gas temperature |
|
|
|
1 |
74-4914 |
EGT |
800 |
± 4,0 |
100 |
PTT |
490 |
± 1,5 |
20 |
||
2 |
102-4526 |
EGT |
720 |
± 2,0 |
100 |
PTT |
475 |
± 1,5 |
17 |
||
3 |
1-4621 |
EGT |
700 |
± 2,0 |
70 |
PTT |
465 |
± 1,5 |
18 |
Note: all characteristics are in Celsius degrees.
As to
![]() , we shall pay close attention to this parameter and, in general, to an issue of temperature distribution behind the turbines. In the table, the parameter
, we shall pay close attention to this parameter and, in general, to an issue of temperature distribution behind the turbines. In the table, the parameter
![]() changes inside the intervals of 70-100°C for the EGT and 17-20°C for the PTT. So, this parameter of maximal temperature spread is more or less stable. It has also been revealed that a current spread
changes inside the intervals of 70-100°C for the EGT and 17-20°C for the PTT. So, this parameter of maximal temperature spread is more or less stable. It has also been revealed that a current spread
![]() varies inside the range (70%-100%)
varies inside the range (70%-100%)
![]() . Additionally, parameters
. Additionally, parameters
![]() of the EGT and PTT are in an approximate proportion to temperatures Ttmed and Tptmed correspondingly. Moreover, in all analyzed graphs like in Fig. 4 and Fig. 5, an order of particular probes inside the spread
of the EGT and PTT are in an approximate proportion to temperatures Ttmed and Tptmed correspondingly. Moreover, in all analyzed graphs like in Fig. 4 and Fig. 5, an order of particular probes inside the spread
![]() was found to be almost constant during the operation time. Thus, the above description of a temperature measurement spread for different probes allows to state that the spread itself is relatively stable during the time, as well as a measurement distribution inside the spread.
was found to be almost constant during the operation time. Thus, the above description of a temperature measurement spread for different probes allows to state that the spread itself is relatively stable during the time, as well as a measurement distribution inside the spread.
What explanation for this significant and stable data dispersion can be done? It could be a result of probe’s different systematic errors. However, many sources [for example, 11,12] report a total thermocouple error being less than ±1% while the spread
![]() is considerably higher. It arrives at ±5% for the EGT and ±2% for the PTT. These values were calculated on the data from Table 1 with a preliminary temperature conversion to Kelvin degrees.
is considerably higher. It arrives at ±5% for the EGT and ±2% for the PTT. These values were calculated on the data from Table 1 with a preliminary temperature conversion to Kelvin degrees.
On the other hand, it is known [3] that a uniform temperature distribution behind a turbine is usually disturbed by burner faults such as clogged or eroded fuel nozzles. Taking into account the above information, a main rational explanation for the observed thermocouple probe measurement spread is a nonuniform circular profile of real temperatures behind turbines, especially behind the HPT. To these explanations, it is important to add the conclusion that this irregular temperature profile is generally conserved during the operation time according to the described above analysis. The profile stability allows developing effective algorithms of EGT and PTT profile monitoring.
Proceeding with the analysis of particular thermocouple probes’ data, in the next section we consider in detail some specific cases of irregularity in these data.
4. Cases of Thermocouple Data Abnormal Behaviour
The term "abnormal behaviour" means here an anomaly in measurements of a particular probe when they deviate from common data behaviour of the other probes. Three anomaly types will be analysed below in subsections 4.1, 4.2, and 4.3. The first type is related with single measurement outliers that exceed a normal noise. Different cases of such outliers are analyzed in the next section.
4.1. Single Outliers
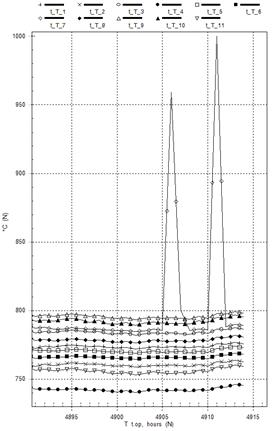
Although the database data were filtered and averaged before recording, some cases of single thermocouple probe faults have been found. Graphs (a) and (b) in Fig. 6 illustrate them. Observing two 25% spikes in graph (a) and a 50% spike in graph (b), we can conclude with no doubt that they are results of faults of the corresponding EGT probes: the seventh probe of engine 1 and the first probe of engine 3. We can also see that such large outliers are easily detectable and the used filtering algorithm should be modified to exclude them. Opposite spike directions in the graphs probably indicate different thermocouple fault origins.
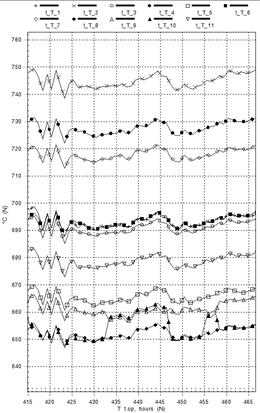
A greater number of small outliers have been revealed as well. Graph (c) in Fig. 6, where EGT measurements for engine 1 are shown, helps to demonstrate these hidden errors. As can be seen here, two abnormal shifts in probe 10 data are distinguishable against common regular behaviour of the other probes. These small outliers of 10 degrees (1,5%) hardly exceed a normal noise level. Consequently, it will be more difficult to automatically detect and exclude them.
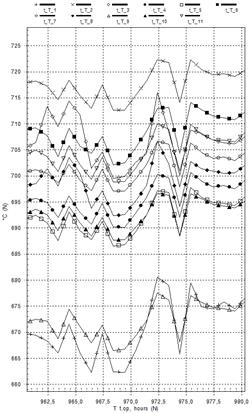
Graph (d) of Fig. 6 present a new case of small outliers that was found out in EGT measurements of engine 3. It is visible in the graph that probes 7 and 8 are synchronously displaced by about 10 degrees during two time intervals t = 962,5-966,5 and t = 971,5-972,5. Additionally, the same measurement increase is observable in the probe 1 curve at time t = 971,5-972,5. So, unlike the previous case of a single faulty probe, the considered case presents correlated shifts in data of some probes and therefore is more complicated. Two explanations can be proposed for this case. The first of them is related with any measurement system common problem that affects some probes and alters their data. So, the outliers can be classified as measurement errors. The second supposes that the measurements are correct but a real EGT profile has been changed in the noted time points. It can be possible because there is no information that EGT and PTT probe profiles should be absolutely stable during operation time. The available data are not sufficient to give a unique explanation; more recorded data should be attracted.
a |
b |
c |
d |
Fig. 6. EGT probes' errors: a – single gross errors, engine 1 ; b – single gross errors, engine 3;
c – single small errors, engine 1; d – correlated small anomalies, engine 3
The next case to analyze is related with the influence of a power plant operating point on EGT and PTT profiles.
4.2. Anomalies induced by operating condition changes
Any considerable change of engine operating conditions (power set parameter above all) causes the corresponding shift of hot section temperatures. Such significant temperature changes, in their turn, can potentially give new information on the behaviour of particular probes in different parts of a total measurement range.
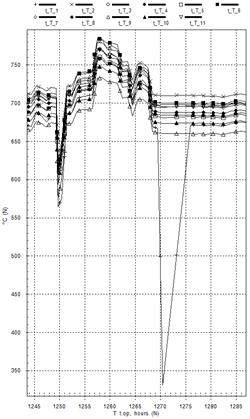
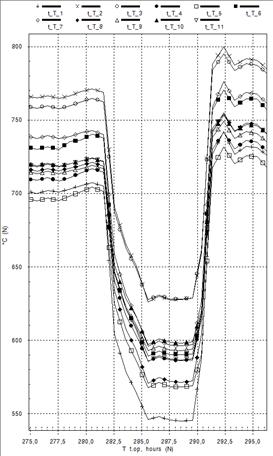
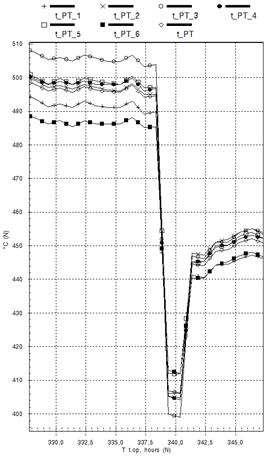
The available EGT and PTT data have been observed to find out interesting cases of operating condition influence. Two revealed cases are presented by graphs (a) and (b) in Fig.8. In the left part of graph (a), a mean EGT is maintained at the approximately constant level of 730°C, then the temperature level is rapidly reduced up to 585°C, and finally it is recovered to 755°C in the right part. A mean PTT in graph (b) behaves in a similar manner.
a |
b |
Fig. 7. Influence of engine operating point:
a – EGT, engine 1; b – PTT, engine 2
These common and large temperature variations are accompanied by small but visible changes of the measurement distribution inside of a total spread
![]() . For example, it can be seen in graph (a) illustrating EGT probe behaviour that in the left and right parts of the graph the curve of probe 1 is situated higher than the curve of probe 5. However, in the central part, where temperatures are reduced, the curves' positions are apposite. As a result, relative curve positions have been changed by 30°C or 4,5%.
. For example, it can be seen in graph (a) illustrating EGT probe behaviour that in the left and right parts of the graph the curve of probe 1 is situated higher than the curve of probe 5. However, in the central part, where temperatures are reduced, the curves' positions are apposite. As a result, relative curve positions have been changed by 30°C or 4,5%.
Other example can be seen in graph (b), where PTT probe curves are presented. Before the point t = 339,5, where the temperature level drops, the third probe occupies the highest position among all probes. It goes to the lowest position then and finally almost comes back to its highest position after the point t = 340,5, when a temperature level is partly recovered. In this example, the curve position of probe 3 has been changed by 15°C (3,3%) relatively a mean temperature T_PT.
The described distortions in the distribution of thermocouple probe data can not be classified as random thermocouple errors because the anomalies are obviously related with operating condition changes. Other possible interpretation implies a systematic probe error that varies due to temperature magnitude variations. However, this error as well as a total error should be within the limit ±1% for thermocouples in good condition. So, a variable systematic error may only be responsible for a part of the 4% measurement distortion that is why another explanation should be added. As a result of the performed analysis, the next explanation is accepted as principle: the profile of real temperatures slightly varies with the change of operating conditions.
Now we revert to the mentioned above case of engine 1 deviation shifts at the time point t= 3351. To make clear this case, direct temperature measurements will be studied in the next section on the basis of the same temperature graphs as analysed in subsections 4.1 and 4.2.
4.3. The Case of Engine 1 Measurement Shifts at the Point t = 3351
Figure 8 helps to illustrate EGT measurement behaviour for engine 1 operation around the point t= 3351. To distinguish better temperature curves of different probes, only four more representative probes are presented. We can see that a temperature level drastically changes in the central part of the figure and relative positions of probe curves are altered, especially after the noted point. For example, probe 4 occupies the highest position in the left part of the figure but the lowest position in the right part. At first sight, this looks like the temperature profile distortions induced by operating condition changes that is described in the previous subsection. However, the analysis of the data recorded after the point t= 3351 has shown that the temperature profile altered once at this point is not recovered later. Consequently, the studied case is not similar to the previous ones.
To better understand the case, let us put together all known information about it. This information given earlier in the present paper and obtained in previous studies can be presented by three following statements.
a) At the time point t= 3351, significant shifts take place in the deviations dTtmed and dTptmed of mean temperatures (see figures 2 and 3) as well as in the deviations of monitored pressure variables [2].
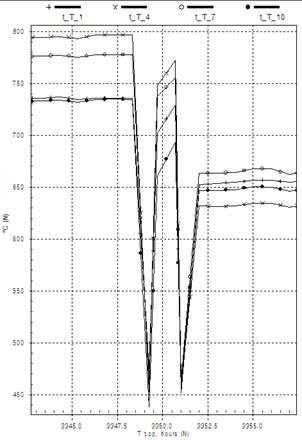
Fig. 8. Measurement shifts after the point t = 3351
(4 EGT probes of engine 1)
b) At this point, shifts of opposite directions are also observable in most of particular deviations dTti of EGT probes (see Fig.2). PTT deviations dTti are synchronously shifted at the same point (Fig.3).
c) A measurement distribution between EGT probes is perturbed at the same point and a new temperature profile is then conserved constant.
Taking into account all this information, we think that there is no unique explanation for the studied case and the following interpretation, which includes some probable causes, is proposed. It seems to us that the engine has undergone an unplanned service work including some actions. A part of them, for example, unplanned compressor washing, could return gas path temperatures and pressures to their healthy engine values. The others, for instance, clogged fuel nozzles washing or thermocouples recalibration could change the EGT measurement profile. This explanation of the analyzed case is supported by the fact that the engine was out of operation 42 calendar days before the mentioned operating time point.
The results obtained by thermocouple probe data analysis and the perspectives of their applications are discussed in the following section.
5. Discussions
A primary visual analysis of gas temperature measurements has been conducted in two previous sections. It needs some clarification and generalization and three issues are additionally discussed below: a) quality of the measurements, b) perspectives of gas temperature profile monitoring, and c) effectiveness of the present visual temperature analysis.
Gas temperature measurement quality depends on thermocouple accuracy and reliability and can correspondingly be assessed by a noise level
![]() and a number of error cases revealed. Coming back to Table 1, we can see that EGT and PTT probes have approximately equal accuracy levels for all engines excepting engine 1, which has a two times worse EGT accuracy. It is also worth to repeat the statement made in subsection 3.3 that the measurements of all considered engines are equally exact with the same exception.
and a number of error cases revealed. Coming back to Table 1, we can see that EGT and PTT probes have approximately equal accuracy levels for all engines excepting engine 1, which has a two times worse EGT accuracy. It is also worth to repeat the statement made in subsection 3.3 that the measurements of all considered engines are equally exact with the same exception.
As to the probe reliability, the probe fault cases have been revealed in EGT data only and the most of them correspond to engine 1. Summing up the discussion on common measurement quality, we can state that the EGT measurements are a little worse than PTT ones and engine 1 temperature measurements are the worst among three engines under analysis.
The deviation curves of Fig.2 help to indicate particular probes that are responsible for low quality of engine 1 EGT measurements. Elevated fluctuations in the deviations dTt1 and dTt2 point at elevated errors of probes 1 and 2. Moreover, it can be seen that the deviations of probes 1, 2, 9, and 11 differ from the other deviations in the reflection of compressor fouling and washings. Specific behaviour of the deviations of the enlisted probes can also be explained by elevated measurement errors of these probes: erroneous data included in reference sets could result in inadequacy of the corresponding reference functions and abnormal behaviour of the deviations.
Perspectives of monitoring of EGT and PTT profiles are the next issue to be discussed. It can be seen in Fig.4 and Fig.5 and it is typical for all analysed data that, in general, measurements of particular thermocouple probes change synchronously. This means that the configuration of temperature profiles behind the HPT and PT is altered a little by variations of engine operating conditions. It is a good promise for performing effective temperature profile monitoring. The hypothesis that the EGT profile has been changed at the point t= 3351 due to the service work carried out is an additional confirmation of profile monitoring utility: since the profile varies because of the supposed fuel nozzle washing, it is also sensible to nozzle clogging. One more proof of EGT profile sensibility to hot section faults is that the EGT profile nonuniformity is, in average, five times higher than the PTT nonuniformity (see to the parameter
![]() in Table 1). For these reasons, the monitoring of the EGT profile seems to be more effective than the PTT profile monitoring.
in Table 1). For these reasons, the monitoring of the EGT profile seems to be more effective than the PTT profile monitoring.
In any case, it will be a challenge to create effective profile monitoring algorithms. Such algorithms should be sophisticated enough in order to reliably distinguish four situations: normal probe noise, probe faults, normal temperature profile variations (random or systematic), and profile changes due to hot section faults (gradual or abrupt). If the faults have been detected, their correct identification is desirable as well.
However, an effective fault detection and identification will not come easily. The temperature profile monitoring may become complicated because, as determined in subsection 4.2, variable operating conditions can change a little the profile. Moreover, as shown in subsection 4.1, slight random profile variations are also possible. As a result, we could not always give a unique explanation for the measurement anomalies analyzed in the present paper and we sometimes supposed both hot section faults and sensor errors.
Having mentioned the uncertainty in our explanations, it is the moment to discuss the last issue - effectiveness of the present gas temperature analysis on the basis of deviation and temperature plots. The used graphical tools were useful for determining common characteristics of thermocouple probe behaviour such as a level of normal measurement noise. It is worth to mention that the used graphs have allowed a direct noise estimating for each engine on its real data. The graphical tools also helped to detect many interesting cases of measurement anomalies and to get convincing explanations for a part of them. These tools were useful in the interpretation of the other cases although some uncertainty remained. To better explain these cases, additional tools are required, including statistical treatment of temperature measurements. Such tools should be able to determine individual signatures for each of the enlisted above four situations to be recognized. If that is the case and such signatures are available, the development of effective algorithms for temperature profile monitoring will be only the matter of time. Proceeding with the present analysis, we plan to apply new tools to analyze thermocouple probe measurements in order to determine the basis of effective temperature profile monitoring.
Conclusions
In the present paper, the analysis has been performed of gas temperature measurements by thermocouple probe suites installed behind the HPT and PT. Field data of a power plant for generating electricity were attracted. In order to find out and analyse cases of abnormal measurement behaviour, both temperature deviations and temperature themselves were plotted and tracked for all probes mounted in a power plant hot section. In order to thoroughly study thermocouple measurements and draw sound conclusions on measurement behaviour, the temperature analysis was performed on the data recorded on three particular engines during one year of their operation. This off-line analysis of historic data yielded important diagnostic information about possible thermocouple faults and hot part malfunctions. The analysis allowed estimating some characteristics of normal thermocouple probe behaviour and revealed a number of cases of probe data abnormalities. The cases that are the most interesting from a diagnostic point of view were explored in detail and explanations were given for them. For example, some sensor malfunctions were discovered. It was also revealed that gas temperature profiles have, in general, a stable form although it can be slightly altered by variations in engine operating conditions. A greater importance of EGT profile monitoring was shown as well. In general, we think that the paper can contribute in the development of effective algorithms for temperature profile monitoring. In addition to the analysis performed and conclusions drawn, the detailed graphs of the paper may give new useful information for experienced gas turbine analysts and performance engineers.
The visual thermocouple data analysis conducted in the paper has demonstrated its general effectiveness; we have rapidly tracked a lot of information and studied many interesting cases. However, we could not find a unique correct explanation for some of them. The point is that the displays of hot section faults and hidden sensor malfunctions can be vary similar.
The present paper can only be considered as the first attempt to analyze thermocouple data. The visual qualitative analysis performed should be accompanied by quantitative estimations. If there is no simple way to achieve higher measurement accuracy, we need to better distinguish between hot section and sensor problems. That is why we are thinking about other advanced graphical tools and statistical methods to be applied to the gas turbine thermocouple data.
Acknowledgments
The work has been carried out with the support of the National Polytechnic Institute of Mexico (research project 20091273).
References
1. Loboda I. Deviation problem in gas turbine health monitoring / I. Loboda, S. Yepifanov, Y. Feldshteyn . – Proc. IASTED International Conference on Power and Energy Systems, USA, 2004. – 6p.
2. Loboda I. Diagnostic analysis of maintenance data of a gas turbine for driving an electric generator / I. Loboda, S. Yepifanov, Y. Feldshteyn . – Proc. ASME Turbo Expo 2009: International Technical Congress “Power for Land Sea & Air”, Orlando, Florida, USA, 2009, – 12p.
3. Tsalavoutas A. Combined advanced data analysis method for the constitution of an integrated gas turbine condition monitoring and diagnostic system / A. Tsalavoutas, K. Mathioudakis, N. Aretakis, A. Stamatis. – Proc. ASME Turbo Expo 2000, Munich, Germany, 2000. – 8p.
4. Romesis C. Setting up of a probabilistic neural network for sensor fault detection including operation with component fault / C. Romesis, K. Mathioudakis // Journal of Engineering for Gas Turbines and Power. –2003. – Vol. 125, Issue 3. – pp. 634-641.
5. Kamboukos Ph. Multipoint non-linear method for enhanced component and sensor malfunction diagnosis / Ph. Kamboukos, K. Mathioudakis. – Proc. ASME Turbo Expo 2006, Barcelona, Spain, 2006. – 9p.
6. Borguet S. A sensor-fault-tolerant diagnosis tool based on a quadratic programming approach / S. Borguet, O. Leonard. – Proc. ASME Turbo Expo 2007, Montreal, Canada, 2007. – 10p.
7. Randal T. R. Integrated in-flight fault detection and accommodation: a model-based study / T. R. Randal, K. F. Goebel, N. H. Eklund, B. J. Brunell. – Proc.ASME Turbo Expo 2005, Reno-Tahoe, Nevada, USA, 2007. – 9p.
8. Mathioudakis K. Assessment of the effectiveness of gas path diagnostic schemes / K. Mathioudakis, Ph. Kamboukos // Journal of Engineering for Gas Turbines and Power. – 2006. – Vol. 128, Issue 1. – pp. 57-63.
9. J. C. Hernandez Gonzalez. Development of normal state model for gas turbine performance monitoring / J. C. Hernandez Gonzalez, I. Loboda, C. De La Cruz Alejo. – Memorias del 3er Congreso Internacional de Ingenieria Electromecanica y de Sistemas, Mexico, 2002. – pp. 243 – 246.
10.Benvenuti E. Innovative gas turbine performance diagnostics and hot parts life assessment techniques / E. Benvenuti. – Proceedings of the Thirtieth Turbomachinery Symposium, Texas A&M University, Houston, Texas, USA, 2001. – pp.23-31.
11. Fairbairn G.W. Performance testing and monitoring of compressor units / G.W. Fairbairn, J.R. Nisbet, I.C. Robertson. – Proc. 52nd Autumn Meeting of the Institution of Gas Engineers, London, England, 1986. – 32p.
12.Bryce L. Equipment health monitoring failure mode characteristics case study / L. Bryce, Bennett J. – 17th National Petroleum Show, Calgary, Canada, 2000. – 25p.
Поступила в редакцию 13.10.2009
Рецензент: канд. техн. наук, доц. кафедры конструкции авиадвигателей С.И. Суховей, Национальный аэрокосмический университет им. Н.Е. Жуковского «Харьковский авиационный институт», Харьков.
ДІАГНОСТИЧНИЙ АНАЛІЗ ВИМІРЮВАНЬ ТЕМПЕРАТУРИ У ГАРЯЧИЙ ЧАСТИНІ ГТД
І. Лобода, Я. Фельдштейн, К.Ф. Бійареаль Гонсалес
Температури, виміряні у гарячий частині ГТД, важливі для діагностичного аналізу проточної частини. Для того, щоб отримати відфільтрований середній параметр температури для його подальшого використання у системах керування та діагностики, у одному й тому ж січенні проточної частини, звичайно встановлюється гребінка термопар. Однак, не дивлячись на попередню обробку, результуючий параметр не є повністю вільним від помилок. Для того, щоб усунути чи зменшити ці помилки, дана стаття аналізує аномалії у поведінці кожної термопари промислової газотурбінної установки. З цією метою будуються графіки як самих виміряних величин, так і їх відхилень від нормальних величин. Для того, щоб отримати більш обґрунтовані висновки, аналіз здійснюється на більшім об’ємі даних, зареєстрованих на трьох відокремлених двигунах.
Ключові слова: ГТД, діагностика проточної частини, термопари, дані експлуатації, помилки реєстрації температури.
ДИАГНОСТИЧЕСКИЙ АНАЛИЗ ИЗМЕРЕНИЙ ТЕМПЕРАТУРЫ В ГОРЯЧЕЙ ЧАСТИ ГТД
И. Лобода, Я. Фельдштейн, К.Ф. Бийарэаль Гонсалэс
Температуры, измеряемые в горячей части ГТД важны для диагностического анализа проточной части. Для того, чтобы получить отфильтрованный и осредненный параметр температуры для его дальнейшего использования в системах упраления и диагностики, в одном и том же сечении проточной части обычно устанавливается гребенка термопар. Однако, несмотря на предварительную обработку, результирующей параметр не является полностью свободным от ошибок. Для того, чтобы устранить или уменьшить эти ошибки, данная статья анализирует аномалии в поведении каждой термопары промышленной газотурбинной установки. С этой целью, строятся графики как самих замеренных величин, так и их отклонений от нормальных величин. Для того, чтобы получить более обоснованные выводы, анализ выполняется на большом объеме данных, зарегистрированных на трех отдельных двигателях.
Ключевые слова: ГТД, диагностика проточной части, термопары, данные эксплуатации, ошибки регистрации температуры.
Лобода Игорь Игоревич – канд. техн. наук, доцент Национального политехнического института, Мексика, e-mail: loboda@calmecac.esimecu.ipn.mx.
Фельдштейн Яков– канд. техн. наук, менеджер компании Compressor Controls Corporation, Des Moines, Iowa, USA, yfeldshteyn@cccglobal.com.
Бийарэаль Гонсалэс Клаидия Ф. – студентка магистратуры Национального политехнического института, Мексика.
